I've had a few friends come to me this holiday season asking me what kind of camera to get for the holidays, especially when they're moving from a point-and-shoot to something that gives them a bit more control and lets them grow in their creativity.
I figured I'd pull together the advice I gave my friends, and then give you some equipment recommendations - the gear I'm recommending, at a cost of under $1000, will give you everything you need to get those great portraits and night shots that you've been wanting. This is a complete set of gear that I would feel 100% comfortable bringing with me on a trip to a new city or on an important shoot, and still get excellent shots.
But first, a bit on what you need to make good photographs, in priority order:
What makes a great photograph
1) The light. You can get a great photograph with a Kodak Instamatic if the light is beautiful.
2) The subject. Having a beautiful or interesting subject that you are photographing makes an enormous difference.
3) The composition. Putting the right subject in the right light in an interesting composition can absolutely make a photograph.
4) The lens. A great lens can give you what you need to keep everything sharp, even in low light. I'm a big fan of prime lenses. A prime lens is the opposite of a zoom lens, which is what most people know from those point-and-shoot cameras. With a prime lens, the focal length (the zoom factor) is fixed - so you "zoom" by moving your feet closer to or further away from the subject. :-) Some folks love zoom lenses, and I believe that they have their place - but as I'll explain later, I think that for the novice photographer, they can often be a crutch. Read on.
5) The body. Of course, a good camera body helps, especially using one that has good low light performance, full frame sensor, or AF performance (like the Canon 5D, which is my current workhorse DSLR) but this is actually the least important part of the decision, imho, and is most often the biggest mistake that new camera buyers make - they buy an expensive body and skimp on the lenses, and then they wonder why their photographs haven't improved. I advise going for the most inexpensive body in the manufacturer's line that has full manual controls, and getting great lenses with the money left over.
6) The number of megapixels (a measure of the resolution of the image) in the image. Kudos to my friend Tim Bray for reminding me of this. There's a belief that Megapixels matter, after all, they are usually the first thing you see when you look at a camera spec sheet in a store, and that more must always be better. Look, practically any digital camera made after 2005 - even that point-and-shoot you currently carry around - has more than enough resolution to get a nice print at 8x10, which is the largest that most people print. Trust me though, that more is not necessarily better, or that in today's age, it really even makes a difference. Don't believe the hype. Lots more go into this, including sensor size, sensor sensitivity, bits-per-pixel, and a whole lot of other highly technical stuff that most folks just don't have to worry about. Trust me on this one, one of my best-selling photographs was taken with a 3 Megapixel camera in 2001. I still love looking at it.
What's funny is that most people who are deciding on what to buy think the priorities are exactly the opposite. They think that by getting the most megapixels or by buying the camera that the pros use, they'll get great pictures. Don't believe this. The camera companies are just trying to brainwash you into buying more camera than you need, and you'll end up puzzled as to why your photographs end up looking, well, mediocre.
My recommendations
First, the camera system. In my opinion, both Nikon and Canon make excellent cameras and lenses. So do Sony, Pentax, and Olympus, although their gear is sometimes a bit harder to find. If you've already got film cameras of one type, I'd definitely try to stay within that system in order to use your older lenses. However, if you're starting out from scratch, my recommendation is Canon. They have been the leaders in affordable digital SLR technologies for at least the last 5 years, and show no letup in pushing the state-of-the-art. That's not to say that their system is perfect - but I think that a beginner will get the most bang for his buck starting with a Canon system, and progressing upwards both in lenses and bodies as you grow as a photographer. I'm sure I'll attract the wrath of Nikon fanatics, but that's the way I see it. Of course, do yourself a favor and go and try out the different bodies and lenses and pick one that makes you feel good, but hey, it's my blog post, and you asked for my recommendation.
The gear to buy:
Canon EOS Digital Rebel XT (a.k.a. 350D) 8.0 Megapixel, SLR, Digital Camera (Currently $394.95 at B&H Photo)
 Some people might recommend getting the Kit, which includes a 18-55mm EF-S lens, currently $459.95 at B&H Photo. I don't recommend this, even though it is only $65 more. The lens is pretty crappy, and even though it is not very expensive, I think that it will be used as a crutch by most people who are used to using zooms all the time. I know that this is a somewhat radical statement, but I believe that most people have been completely spoiled by zoom lenses. In my experience, a zoom lens can end up killing an enormous amount of creativity in your photographs as you'll be tempted to just zoom in or out rather than thinking about the best position or composition. It is also a slow lens, which means that its minimum aperture (lens opening) varies between f3.5-f5.6. This means that you'll be pretty unhappy when the lighting is low, or when you want to separate your subject from the background, as in a soft portrait.
The body of the Digital Rebel XT is lightweight and compact. It has a pretty large LCD screen on back for reviewing photos once you've taken them, and you can shoot in RAW mode, which preserves all the details of your shots. It's not the most ergonomic of cameras, but it gives you enough control when in Av or TV mode (aperture priority or shutter priority mode) to have a LOT of control over your shots, in a relatively straightforward way. And I'm going to tell you to get out of all those gadgety modes like the "sports mode" or the "portrait mode" and learn how to use Av and Tv on the camera. Trust me, the time you spend on learning the basics of exposure, f-stops, and shutter speed will serve you over and over and over again. And the Digital Rebel XT won't get in your way there. It even has a built-in flash that you can use for fill lighting (but I'd never use it in the dark, unless you really want to make your shots look mediocre).
Canon 50mm f1.4 USM Autofocus Lens (Currently $309.95 at B&H Photo, with a $20 instant rebate = $289.95)
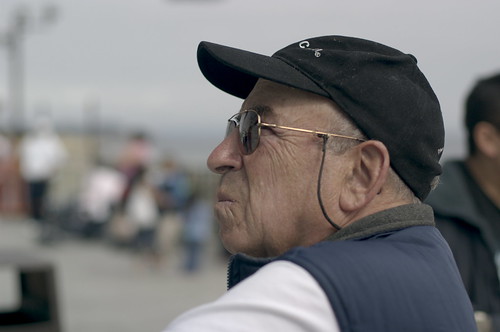
 This is one absolutely fantastic lens. It is a lens that many pros I know still use, and because it is a relatively simple lens, it is inexpensive and has a number of other benefits, like a very close focusing distance. For 35mm film cameras and for digital cameras with full-frame sensors (like the Canon 5D), this is often called a "normal" lens, as it produces about the same perspective on the sensor as what your eye sees. However, the Digital Rebel XT (along with most entry-level cameras) has a smaller sensor - which means that there's an effective magnification of about 1.6x that occurs when you put any lens onto the camera. So, that makes this inexpensive 50mm lens into about a 90mm f1.4 lens - which is a wonderful portrait lens. The photo on the right is a picture of my dad that I took with this lens and an older camera (the EOS 10D) which has the same properties as the Rebel XT. Note the sharpness of the parts that are in focus, while the background (the beach scene) is out of focus. That photo was taken at f2.2, which shows you what you get from a high-quality prime lens, like the 50mm f1.4 USM lens.
The photo on the left was also taken with the same lens. Note the beautiful color rendition in the lotus flower, the leaves, and even down into the dark water - This is one of my personal favorite photographs, and it was taken with a kit that cost under $1000. As you develop your eye, you'll be able to get shots like this as well.
Hoya 58mm Introductory Filter Kit (Currently $54.95 at B&H Photo)
 I am a big believer in putting a high-quality UV filter on every one of my lenses as soon as I get them. I've dropped my cameras and lenses lots of times, and I've broken a lot of filters, but I've never broken or seriously scratched a lens. There are some lenses, like extreme wide angle lenses, where you can't do this, but those are the exception to the rule, and those are usually very expensive or special-purpose lenses. Some people will object to putting another piece of glass in front of the lens surface, but in my experience, if you keep replacing the filter when it gets too dirty or scratched beyond repair, you still have a pristine lens underneath.
In addition, this filter kit includes a circular polarizer, which is a great accessory to have with any camera. You can use this to make blue skies look darker, enhance or remove reflections or glare on water and other translucent surfaces. You can even use this filter in some advanced flash applications when you get more adventurous with your flash. Some circular polarizers cost $60 by themselves, so you're really getting two filters along with a nice filter pouch, for $54.95 - it's quite a bargain. Oh, and they throw in a "warming filter" which is basically useless. Don't worry about this, you can feel comfortable never using that filter, you're still getting a great deal with the UV filter and the circular polarizer.
SanDisk 4GB Extreme IV CF Card (Currently $91.95 at B&H Photo)
 One of the things I learned when I started shooting digital in 2000, was to take lots of pictures - the beauty of digital is that there's essentially no cost to just keeping the motor drive on, and shooting lots and lots of pictures when you're in a good situation - chances are that you'll end up coming up with something that you like. You'll catch a unique expression, you'll get some interesting blur you didn't think about, or you'll catch something unique and spontaneous when you take this attitude. In order to do this reliably, though, you need a big memory card, and you want to make sure that the card can record files quickly so you can capture more pictures in quick succession. In my experience, the SanDisk Extreme IV cards are very very fast - and they have been coming down in price as well! To get a fast 4GB card, which should hold about 250-300 RAW pictures, for under $100 is an absolute steal. This card, which I bought about a year ago, was about $250 then, which shows how technology keeps improving and prices keep dropping. Take advantage!
You could get the 8GB version of this card, but my suggestion would be to get two of these cards if you wanted to splurge for an extra $100 or so - that way you'll have a backup, and you won't feel so bad when you lose one of these cards. :-)
SanDisk Extreme USB 2.0 Card Reader (Currently $19.95 at B&H Photo)
 You'll need a decent CF card reader to transfer the pictures off of the camera to your computer. Most cameras come with a USB 2.0 interface, but I don't suggest using it - it is generally a slow interface and also wastes the camera's batter while you are downloading pictures. Better to carry around a small USB 2.0 card reader like this one in order to transfer the files - you just pop out the CF card, put it into the reader, and let your computer's software do the rest. Some folks make claims that there are faster CF readers out there, like Firewire readers, but in my experience, the reader is irrelevant, it is all about the speed of your CF card, as long as the reader (and your computer) is USB 2.0 compliant. Most new PCs and Macs are.
Conclusions
So, how did we do? Well, if you add it all up, your total spend will be $849.75. Add shipping, and you're going to spend about $900 for this entire kit - which is a fantastic starter kit into the world of DSLR photography.
Want more?
To fill out this set, you might want to get a good camera bag so that you can easily fit all your gear into a safe, rain-resistant bag. This is a matter of personal preference, and my suggestion would be to go to the biggest camera store you can find with your kit and try out all the different bags, until you find one you like. Then go buy the bag at the store - you should really help your local camera store. If you live in San Francisco, I recommend Calumet, they have a friendly knowledgeable staff, and they've got a good selection of cameras, lenses and bags. As for my choices, I'm a personal fan of the Domke bags, I might get the F-3X super compact bag for this kit. Alternatively Tamrac's Velocity 6x might be a good choice as well. They're well made, and are easy on your back.
You'll probably want to start filling out your selection of lenses as well. I highly recommend adding a few other lenses, which are excellent, affordable lenses: The 24mm f2.8 lens for street and wide-angle shots, the 35mm f2.0 lens for a more traditional "normal" lens on this camera, and maybe even the 100mm f2.8 Macro lens for extreme closeups.
Last, if you are new to the concepts or exposure: f-stop, shotter speed, and ISO, you should learn a bit about them. I like the Amphoto book Understanding Exposure, which has been through a whole bunch of editions, starting back in pre-digital days. Well worth the $16.47 it is currently selling at on Amazon.
No matter what you choose, don't forget to go out there with your new camera and take lots of pictures!
Technorati Tags: photography, photography, camera, photography, buyersguide, digital, dslr, holidaybuyerguide, purchase, slr